
Features
8 tracks can be played, controlled from one transmitter channel
Output is selected by repeatedly moving the operating channel to one of the extremes
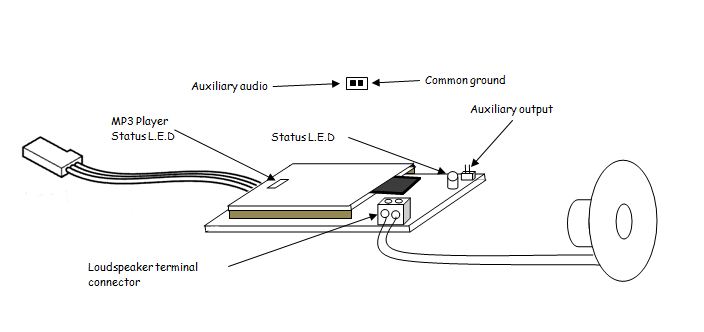
The LED lights each time the stick is at the extreme to aid counting
The tracks can play repeatedly if required
Instructions
Plug the flying lead on the 8 Way MP3 Player into the selected channel on your receiver. Move the selected operating channel to neutral and switch the transmitter on and then the receiver. If you have travel adjust on your transmitter, set the chosen channel to 100% travel. If you are using a 2-position switch to operate the 8 Way MP3 Player the “play” switch position will be decided later. The 8 Way MP3 Player LED will blink while the unit boots. If the LED remains on following the boot sequence the operating switch is in the wrong start-up position. In this event, switch the 8 Way MP3 Player off, move the operating switch to the other position and switch the unit back on. If the unit is not switched off, track 1 will play repeatedly shortly after the switch is repositioned.
Operation by stick
The sound tracks are selected by moving the operating stick a number of times to the extreme and back to neutral. The unit counts the number of times that the stick is at the extreme and plays the appropriate sound. Move the stick momentarily to each extreme in turn. The side when the LED lights is the operating side and should be used for selecting the track. When doing this, track 1 will play shortly after the stick is returned to neutral.
The operating stick can be moved as fast as your fingers or the radio system can respond but the sound track will not play until the stick has remained at neutral for the enable time of about a second. The delay tells the 8 Way MP3 Player that the stick sequence is complete. This means that you must not pause for too long with the stick at neutral when selecting the track or the “current count” track will play.
To select the first track, move the stick to the operating side and then back to neutral. The first track will play after a short delay.
To select the second track, move the stick to the extreme, return it to neutral and then move it a second time to the same extreme and return it to neutral. The second track will play after a short delay.
The stick sequence, extreme – neutral – extreme – neutral – extreme – neutral plays the third track.
The stick sequence, extreme – neutral – extreme – neutral – extreme – neutral – extreme – neutral plays the fourth track.
And so on up to the eighth track
As an aid to practice, the LED will light each time the stick is at the extreme and go out at neutral.
Operation by switch
The operation is the same as with a stick except that the switch is flicked the required number of times from the start position and back again. Each flick will increment the selected track. 2 flicks will play track 2, 3 flicks will play track 3 and so on.
Please note that the stick movements are not monitored while the track is playing. Starting a new count sequence while a track is playing will give unpredictable results.
Repeat Play
The track will repeat continuously if repeat play is activated during the track selection sequence. To activate repeat play, hold the stick/switch at the extreme for at least a second or so on the last movement of the count. When the stick/switch is returned to neutral to complete the sequence, the track will play and repeat continuously. The stick/switch can be held at the extreme for as long as you wish but the repeat play will not start until the stick/switch is returned to neutral. To stop the repeat play, move the stick/switch to the extreme and hold it there for about a second or so after the track finishes. If the stick/switch is released while the track is playing or before the end of the disable time, the repeat play will continue. Again, the stick/switch can be held at the extreme for as long as you wish. The usual technique for cancelling a long track is to hold the stick at the extreme while the track plays and when the track stops wait for the second or so disable time and then return the stick to neutral.
Please note that if you attempt to cancel a long track that is not actually in repeat mode, the system will think that you are attempting to enable the repeat mode. As a single movement selection is for track 1, track 1 will play in repeat mode when the stick is returned to neutral.
Micro SD Card Handling
Note: the micro SD card socket is a ‘push to eject’ style socket (so you must press the card inwards slightly to eject it). If you simply pull hard on the card without ejecting it you may cause physical damage to the socket and/or the MP3 module
Files must be stored in a directory named “MP3” and file names must begin with a four digit number (using leading zeros) relating to the trigger track required. Users must employ numbers 0001 to 0008. The remainder of the filename can be any meaningful text (dots excluded). For example the following are valid filenames for track 8:- “0008.mp3”, “0008 TRACK.MP3”.
It’s recommend not to use Wav files as this has been found to give strange results with some recordings.
To change the files on the micro SD card fit the card into an adaptor that suits your computer and then plug it in. Most computers will detect the card and assign it as a drive letter.
Once the card has been detected, open the appropriate program on your computer to look at the files.
To change a track for one of your own recording delete one you don’t want and then replace with yours using the same number in front of the track by using rename file etc.


Reviews
There are no reviews yet.